Plastering is a time-honored skill that continues to evolve with new materials and advanced tools. For both professional plasterers and ambitious DIYers, the outcome of any plastering project is determined by precision, technique, and–most importantly–the tools used. Equipping yourself with reliable tools like Huds Refina precision tools can transform the plastering process, providing smoother finishes and greater efficiency, whether you’re tackling a wall renovation or building from scratch.
Understanding which essential tools to use not only streamlines workflow but also ensures durability and professional results every time. Mastering these modern plastering techniques requires a blend of tradition and innovation, making it vital to equip yourself with the right tools from the outset.
From ensuring your base coat is consistently mixed to perfecting those difficult corners, mastering plastering is often as much about choosing reliable gear as it is about skill. The following sections break down each tool’s role in the plastering process so you can approach your next project with confidence.
Equally important, investing in high-quality tools pays off by saving time on each job, reducing waste, and delivering a superior finish that stands the test of time. Understanding exactly when and how to use these essential plastering implements forms the backbone of every successful plastering application.
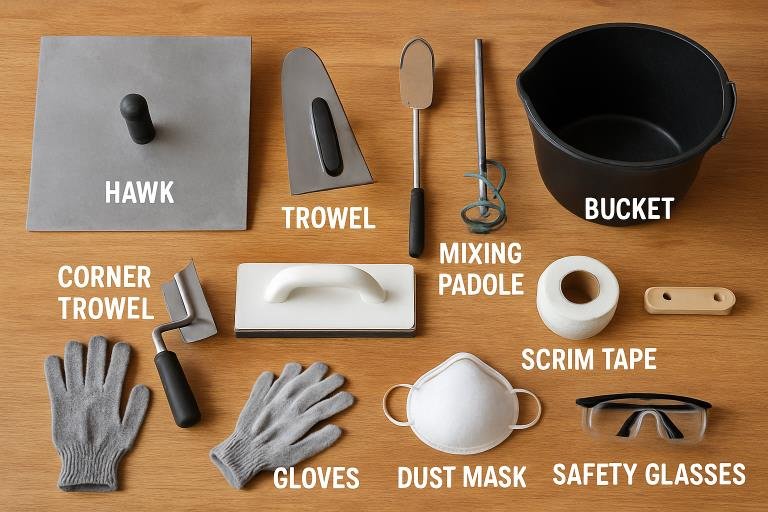
Hawk and Trowel
The backbone of professional plastering, the hawk and trowel work in tandem to deliver precision and speed. The hawk(a flat, lightweight board with an underside handle) holds mixed plaster in a portable, manageable way. With one hand steadying the hawk, the other uses a trowel, typically forged from stainless steel. A high-quality plastering trowel features a comfortable handle and a well-balanced blade, allowing for controlled application and seamless plaster smoothing on walls or ceilings.
The difference between an ordinary and an exceptional finish often comes down to the skillful use of these tools. A versatile trowel makes it easier to feather edges, apply even thickness, and avoid lines, while the hawk enables a steady workflow, boosting speed and minimizing mess.
Mixing Tools
A flawless plaster mix forms the foundation of any plastering job. Durable mixing buckets with clearly marked volumes ensure you combine materials accurately, maintaining the correct ratio of plaster to water. A heavy-duty mixing paddle, fastened securely to a power drill, delivers thorough blending for lump-free, smooth plaster. Mixing by hand can introduce inconsistencies, but using the proper equipment allows for rapid preparation—critical for larger projects.
Using consistent, high-quality mixing tools not only saves time but also directly affects the workability and adhesion of the plaster. Clean tools also help avoid contamination from dried material or dust, both of which can compromise final results.
Corner Trowels
No matter your experience level, creating sharp, clean corners is one of plastering’s greatest challenges. Corner trowels, manufactured from specially shaped metal, address this issue by adapting naturally to internal or external corners. Their precision design supports the efficient, even application of plaster in tight spaces, minimizing the need for post-drying repairs and dramatically improving aesthetics.
They come in a variety of sizes to fit standard or custom corner dimensions. This flexibility makes them indispensable for both repair projects and new constructions where multiple angles are involved.
Floats
Wooden, Plastic, and Metal Floats
Once the initial plaster coat is on, floats become essential for shaping, texturing, and finishing the surface. A wooden float provides a coarser texture for initial smoothing or scratch coats, while a plastic float is valued for its lightweight build and adaptability to both fine and coarse textures. For an ultra-smooth finish, a metal float—often called a finishing trowel—allows you to burnish the final coat, achieving a polished look ideal for paint and wallpaper.
Choosing the right float and knowing when to use each can be the difference between a problem-free job and endless touch-ups.
Scrim Tape
Even when applied perfectly, plaster can crack at joints and seams, especially where plasterboard meets. Self-adhesive mesh scrim tape strengthens these critical points, preventing movement and the hairline fractures that develop over time. Applying scrim tape to all joints before your first coat ensures structural integrity, extends the finish’s lifespan, and eliminates future patching or unsightly lines.
Plastering Brush
After the bulk of plaster is applied and smoothed, a plastering brush comes into play. Traditionally made with natural bristles, it is used primarily to wet the surface during final smoothing and to clean off excess plaster or dust. This small step can make all the difference in ensuring a uniform texture and seamless appearance. Furthermore, the brush helps maintain clean edges at corners and at transitions to different materials.
Safety Gear
Protective Equipment for Every Project
Even the most experienced professionals know never to neglect personal safety. Protective eyewear blocks airborne dust and accidental splashes. Dust masks are crucial for minimizing inhalation of fine particles, especially during mixing and sanding stages. Well-fitting gloves protect hands from caustic lime and other chemicals found in plaster while preserving dexterity during detailed work.
Using these essential plastering tools and committing to proper technique makes the modern plastering approachable, efficient, and rewarding. Prioritizing quality equipment, regular maintenance, and thoughtful preparation ensures the best possible outcome for every project and guarantees that your work will stand strong for years to come.