Stucco is a versatile and durable exterior finish that enhances both the appearance and longevity of residential and commercial properties. Proper stucco installation ensures that walls are not only aesthetically appealing but also resistant to weather, moisture, and environmental wear. We will explore the step-by-step process of installing stucco professionally, highlighting key techniques and considerations to achieve a strong, long-lasting finish. By understanding the methodical approach to stucco application, homeowners and contractors can ensure that each project delivers consistent results, protects structural integrity, and enhances overall curb appeal.
Stucco Installation Process
Surface Preparation
The foundation of a successful stucco application is thorough surface preparation, and hiring a Stucco Contractor in Mississauga can ensure this step is handled efficiently. Begin by cleaning the wall surface to remove dirt, dust, or loose materials that could interfere with adhesion. For new construction, ensure that framing and sheathing are properly installed. Existing walls may require the removal of old paint, stucco, or debris. Moisture barriers or house wrap are installed to protect against water infiltration, and metal lath or mesh is attached securely to provide a base for the stucco. Attention to detail during this stage ensures that the stucco bonds effectively, preventing cracks or detachment over time.
Mixing the Stucco
Creating the proper stucco mix is crucial for durability and workability. Traditional stucco consists of a combination of cement, sand, lime, and water, though modern EIFS systems may include lightweight additives for flexibility. The ingredients must be blended consistently to achieve a smooth, uniform texture. Mixing should follow recommended ratios to avoid overly wet or dry material, which can compromise adhesion and surface quality. A well-prepared mixture allows for easier application, reduces the risk of cracking, and ensures that the final finish maintains strength and resilience against environmental stressors.
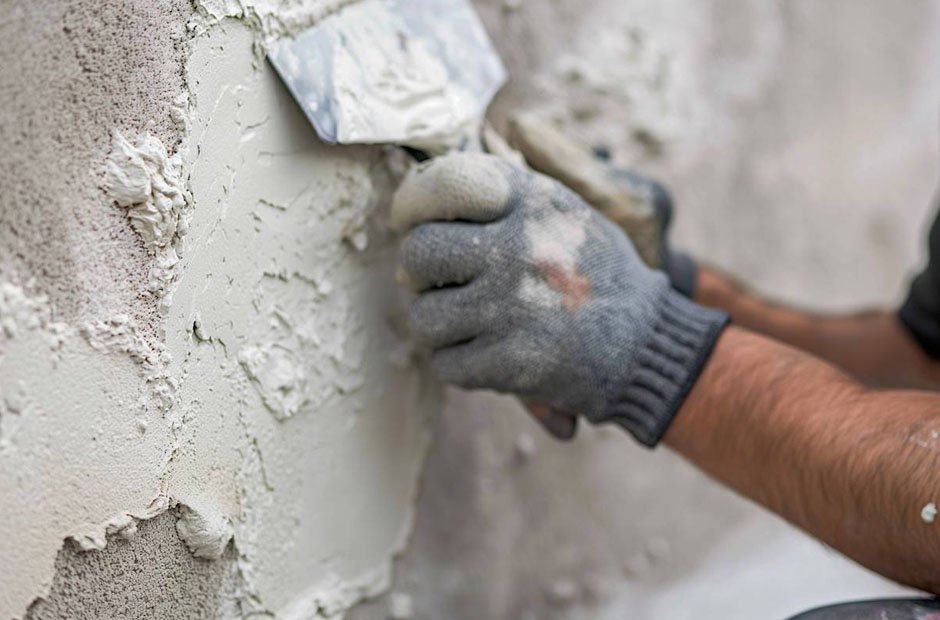
Applying the Scratch Coat
The first layer of stucco, known as the scratch coat, serves as the primary base. Apply this layer evenly, typically about 3/8 inch thick, pressing it into the lath to secure adhesion. Once applied, the scratch coat is scored horizontally with a trowel or comb to create a rough texture. This texture allows the subsequent brown coat to bond effectively. The scratch coat should be allowed to cure partially, usually for 24 to 48 hours, depending on climate conditions. Proper curing at this stage is essential to prevent shrinkage cracks and ensure a solid foundation for the remaining layers.
Applying the Brown Coat
The second layer, or brown coat, adds strength and smooths the surface. This coat is generally applied at a thickness of 3/8 inch, covering the scratch coat completely. Use a straightedge or trowel to level the surface and ensure uniformity across the entire wall. The brown coat is allowed to cure for several days, during which it should be lightly misted with water to maintain moisture and prevent rapid drying. This layer provides the necessary thickness and structural integrity for the final finish while allowing for minor adjustments to even out imperfections from the scratch coat.
Applying the Finish Coat
The final layer of stucco defines the texture, color, and overall appearance. The finish coat is typically thinner, about 1/8 inch, and can be applied using trowels, brushes, or sprayers, depending on the desired texture. During application, maintain a consistent technique to avoid uneven patterns or streaks. Once applied, the finish coat should be allowed to cure gradually, protecting it from direct sunlight or wind that could cause premature drying. This layer not only provides aesthetic appeal but also contributes to the protective qualities of the stucco, creating a weather-resistant, durable surface.
Curing and Maintenance
After completing the stucco application, proper curing is essential to ensure longevity and prevent cracking. Lightly mist the surface with water periodically over several days to maintain optimal moisture levels. Avoid heavy impacts, sudden temperature changes, or exposure to harsh weather during the curing period. Once fully cured, regular maintenance, including cleaning, inspection for minor cracks, and timely touch-ups, helps preserve the appearance and structural integrity of the stucco. Addressing small issues early prevents more significant problems, ensuring that the exterior remains durable, attractive, and functional for many years.
Optional Painting or Sealing
Depending on the design preference, stucco can be painted or sealed to enhance color and provide additional protection. Use high-quality, breathable paints or sealants to allow moisture to escape while shielding the surface from environmental wear. Applying coatings correctly prevents peeling or discoloration and extends the lifespan of the stucco finish. Regular inspection and occasional reapplication of sealants or paint help maintain the original look and durability. By taking this step, property owners can enjoy a vibrant, weather-resistant exterior that complements their overall architectural style.
Professional stucco installation is a meticulous process that combines preparation, proper material mixing, layered application, and careful curing. From the scratch coat to the finish layer, following a systematic approach reduces the risk of common issues like cracking or uneven surfaces. Maintaining the completed stucco through regular inspections and optional protective coatings further enhances durability and longevity. By adhering to these step-by-step practices, property owners and contractors can achieve a high-quality stucco exterior that delivers lasting protection, energy efficiency, and aesthetic appeal for years to come.