A roof tear-off is a crucial stage in the process of roof replacement that prepares a home for a fresh, durable roofing system. Many homeowners may wonder what actually takes place during this phase and why it is necessary. We will explore the steps involved in a roof tear-off, the reasons it is carried out, and how it impacts the overall lifespan and performance of a roof. Understanding the process can help homeowners anticipate the work required, recognize the importance of safety measures, and appreciate the value of thorough preparation. A tear-off is not just removing old shingles; it is a detailed process that lays the foundation for a stronger and more reliable roof. With careful planning and execution, a roof tear-off ensures a smooth transition to a renewed roofing system.
The Roof Tear-Off Process: Step by Step
Initial Inspection and Preparation
Before any physical work begins, the Superior Roofing team conducts a detailed inspection of the existing roof. This includes identifying areas with significant damage, leaks, or structural weaknesses. Preparation is essential to maintain safety and efficiency during the tear-off. The work area is cleared of obstacles, and protective coverings are placed on landscaping and exterior features to prevent damage. Equipment such as ladders, scaffolding, and waste containers are positioned strategically.
This preparatory step allows the team to work systematically, minimizing the risk of accidents or errors. Proper preparation also includes planning the disposal of roofing debris, which is critical for maintaining a clean work environment and ensuring local regulations are met. Without thorough preparation, the tear-off process can become chaotic, increasing the chance of mistakes and extended project timelines.
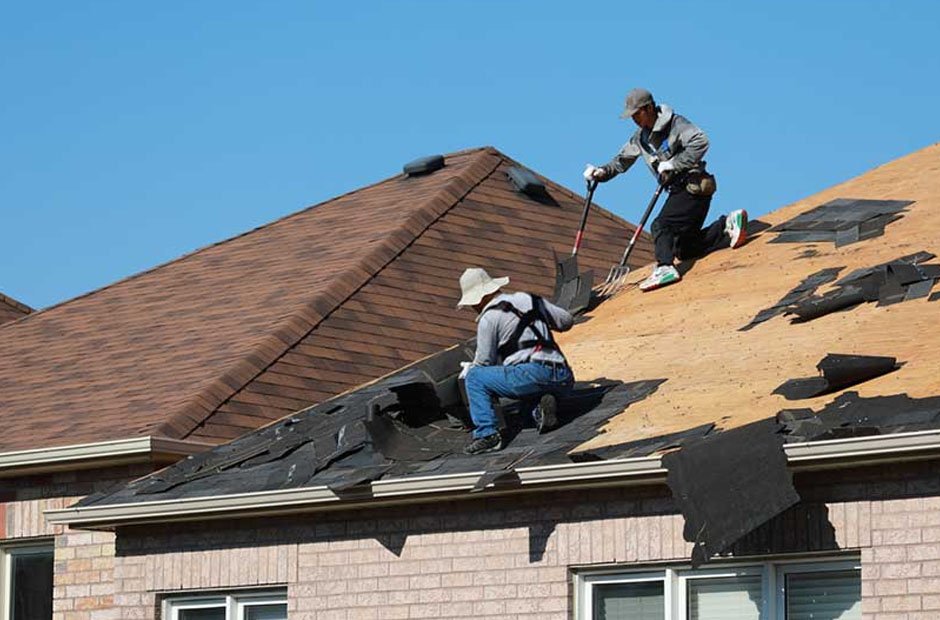
Removing Old Shingles
The first physical step in a roof tear-off is stripping away the old shingles. Shingles are removed systematically using specialized tools designed to lift and pull them off without damaging the underlying decking. This process often involves starting at the top of the roof and working downward to avoid debris sliding back onto areas already cleared. Shingles that are deteriorated, curled, or cracked are carefully separated from nails and removed. The removal process not only clears the roof for new materials but also allows the team to assess the condition of the underlayment and decking. If shingles are removed improperly, it can lead to damaged decking or an uneven surface, which can compromise the performance of the new roof. Proper disposal of old shingles is handled carefully, often transported to designated recycling or landfill facilities.
Inspecting and Repairing the Roof Deck
Once the shingles are removed, the roof deck is exposed. The decking, typically made of plywood or oriented strand board (OSB), is carefully inspected for damage such as rot, warping, or water infiltration. Any compromised sections must be replaced or reinforced to provide a solid foundation for the new roofing system. This step is critical because the structural integrity of the roof deck directly affects the durability of the new roof. If damaged decking is overlooked, the new shingles may fail prematurely, leading to leaks and costly repairs. Repairing the deck involves replacing damaged boards, securing loose sections, and ensuring a level surface for proper installation of underlayment and shingles. This stage often reveals hidden issues that were not visible before the tear-off, highlighting the importance of a thorough inspection.
Removing Flashing and Other Roofing Components
During a tear-off, all additional roofing components, such as flashing, vents, and drip edges, are removed. Flashing is the metal or composite material used to seal the edges of roofs, valleys, and areas around chimneys or skylights. Old flashing may be rusted, bent, or otherwise compromised, making its removal necessary. Similarly, vents and other protrusions are temporarily taken off to ensure the roof surface is fully prepared for new installations. Removing these components allows for replacement with new materials that match the updated roof system, improving overall water resistance and durability. This process also provides the team with an opportunity to inspect the areas around roof penetrations for any signs of water damage or structural weaknesses that may require attention before the new roofing materials are installed.
Cleaning and Preparing the Surface for New Materials
After the old materials and components are removed, the roof surface is cleaned to ensure it is free of debris, nails, and dust. This cleaning step is crucial for creating a smooth and stable surface for the installation of underlayment and shingles. Any remaining nails or fasteners from the old roof are removed, and the surface is inspected for splinters or rough areas that could affect the new materials. In some cases, minor leveling or sanding may be performed to achieve an even surface. A clean and properly prepared deck ensures that underlayment adheres correctly and shingles lay flat, which is essential for preventing leaks and wind damage. The thorough cleaning of the roof deck also contributes to a professional appearance and a longer-lasting roofing system.
A roof tear-off is a comprehensive process that involves more than just removing old shingles. It involves careful preparation, systematic removal of materials, detailed inspection, and repair of the roof deck, along with safety and debris management measures. Each stage ensures that the underlying structure is sound and ready for a new roofing system that will perform efficiently for years to come. Understanding what happens during a tear-off provides homeowners with insight into the work required, the attention to detail involved, and the importance of a structured approach. By addressing every aspect of the tear-off, from removal to final inspection, homeowners can feel confident that their roof replacement is built on a solid foundation, ensuring protection, durability, and long-term performance.